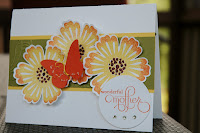
At our workshop last week we made a great pop up card for Mother's Day. This one is a case of a card made by Heather Hampton Freeman on the Stampin'Up! demonstrators web site. I unashamedly copied the front of her card because I thought the colors were so pretty. As always, I made a few changes to make it work with what I have. The inside I made way different because I wanted it to look and work a certain way! It looks intimidating, but it is not- and it is really fun to make.
The front of the card is Daffodil Yellow layered with Old Olive card stock on Whisper White background. The old Olive I ran through an embossing folder in the Big Shot. I stamped three flowers onto white card stock using the rock and roll method. That is, you stamp in the lighter of two colors, then roll the edge of the stamp in a darker color, press on your paper- and boom- you have beautiful two toned images! I used Daffodil Yellow, Tangerine Tango and Chocolate Chip ink. Punch these flowers out with the Blossom punch. The greeting is stamped on card stock and punched with the 1 3/4 in punch. A few rhinestones top it off and give the card front a little bling. The butterfly comes from the Beautiful Wings Embosslits Die. It also has a little sparkle with Dazzling Details, and old SU wire wrapped around the center.
The inside of the card is a little more involved! But worth the effort!
It is important to use copy paper for the flowers on the inside of the card. Rock and Roll stamp 6 flowers on copy paper. Punch them out, fold in half, then into thirds so that each piece looks like a piece of pie. Open the pieces so they look like the ones in picture 1.
 |
| Picture 1 |
I am using different color paper only for this demonstration. You will be working on the back (or outside) of your stamped flowers. You need to place a small amount of tape or glue dots everywhere you see a black dot in picture 1. I also lay my flowers out like this, just so I don't get confused.
Now you are ready to put the flowers together. Place flower 2 on top of the center and right petals of flower 1. Be sure to line things up neatly!
 |
| Picture 2 |
Put flower 3 on top of flower 1's left petal, and flower 2's center petal.
 |
| Picture 3 |
 |
| Picture 4 |
Whew- that sounds complicated! Test your flower a couple of times to make sure it opens and closes like you want.
Now you are ready to put the whole thing together.
Glue the two remaining paper flowers inside the card in the crease.
 Add your flower stack by placing the flower away from the crease far enough that the flowers opens and closes fully. You can hold the number 1 and 4 flower with your fingers while you try it. Now lay the flower on one side of the card, put tape on the top flower ( in this case the green one- only) and close the card. Open, and repeat the tape on the other side. Now your flowers will pop open when the card is open!
I highly recommend playing with this before you make a real one- I cannot tell you how many I made before I got one I liked- then I made them without even looking at the directions. It is not hard at all once you figure it out!
Please let me know if you have questions. I hope I included all the steps here- if not just let me know.


